PSA odometer correction, Digiprog 3 V4.94 or PSA BSI V1.2

How to pick up a proper mileage correction tool for PSA group Peugeot or Citroen has been questioned among Peugeot and Citroen owners/mechanics. The top two respected PSA mileage correction tool are PSA BSI and DigiProg 3. What’s the difference between the two?

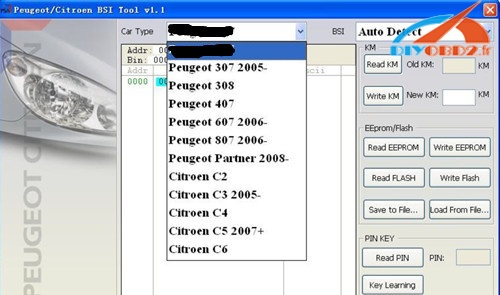
PSA BSI V1.2 is the business tool for Peugeot and Citroen. It can be used to read and write eeprom of BSI, programming new KM BSI and so on. It works on new Peugeot and Citroen models

Peugeot 307 from 2005-…

Peugeot 308

Peugeot 407

Peugeot 607 from 2006 -…

Peugeot 807 from 2006 -…

Peugeot Partner III

Peugeot C8 from 2006 -…

Citroen C2 2009…

Citroen C3 II

Citroen C4

Citroen C4 Picasso

Citroen C5 II

Citroen C6

Citroen Berlingo III

Lancia Phedra from 2006- …

Fiat Ulysse from 2006-…

You need to do dash and BSI, you’d better to have digiprog III (current V4.94 software) and good soldering skills.

DigiProg 3 V4.94PSA group Peugeot & Citroen model list

Peugeot:

Peugeot 508/508 new version

Peugeot 106 diagnostic

Peugeot 206 Jaeger Programming via Micro

Peugeot 206 M2002 NEC All new modules Programming via chip

Peugeot 306 VDO Cluster diagnostic

Peugeot 307 chip programming via Box & Tacho

Peugeot 307 HC12 Programming via Micro

Peugeot 406 Jaeger Programming via Micro

Peugeot 406 Sagem Programming via chip

Peugeot 406 Valeo Box Programming via Box & Cluster

Peugeot 406 VDO Cluster diagnostic

Peugeot 406 VDO 2000/2001 Cluster +BCU

Peugeot 407 Programming via Tacho & BSI

Peugeot 607 VDO Programming via Box +Cluster

Peugeot 806 Jaeger /Magneti Mareli Programming via Micro

Peugeot 807 Programming via Tacho & BSI

Peugeot Boxer Programming via chip

Peugeot Partner Programming via chip

Citroen

Citroen DS3 93C66 new Version DS4 24C16

Citroen C3/DS3 new versions

Citroen Jumper 2007

Citroen: DS3 C3 C66 cas3: hc12x new version

Citroen C3 Programming via Tacho& Box

Citroen C5 Programming via Box& Cluster

Citroen C5 2003 Programming via chips

Citroen C8 Programming via Tacho& BSI

Citroen New Saxo Diagnostic

Citroen Picasso NEC Tacho &Box via Micro& Chip

Citroen Relay Van Chip 95040 Programming via chip

Citroen Xsara 2000/2002 NEC Programming via chips BSI& Tacho

Citroen Belingo 2003/2004 Programming via cluster &BSI

Citroen Belingo HC08 Tacho Programming via Micro

Citroen C3 programming via chip

Citroen C5 New software programming via cluster & BCM

Citroen Evasion Programming via chip

Citroen Relay Programming via chip

Citroen Xantia Programming via chip

Citroen Xsara Programming via chip

Citroen Xsara Programming via BCU & Tacho

Free Download Digimaster 3 Citroen & Peugeot List for km change

Will Know…

Which tool for Citroen Peugeot BSI and Dashboard Mileage Change?

Citroen Peugeot BSI and Dashboard Mileage Correction Advice!!!

Customer:

Which too is best for for Citroen and Peugeot BSI and Dashboard mileage correction??

PSA BSI tool? Or Digimaster III odometer correction master?

Engineers at diyobd2.fr:

PSA BSI tool only support BSI mileage change!!

Digimater3 is the most ideal one for BSI and Dashboard mileage change for Citroen and Peugeot cars.

digimaster-3

Digimaster 3 car list:

Citroen and Peugeot are included!

digimaster-3-car-list

Citroen model lists

Type Information Adapter
C2 BSI OBP Adapter
Tacho OBP Adapter
C3 BSI OBP Adapter
Tacho OBP Adapter
C4 BSI OBP Adapter
TACHO OBP Adapter
Sega BSI OBP Adapter
Meter OBP Adapter
C5 BSI Valeo\Meter OBP Adapter
C8 BSI module OBP Adapter
Dash OBP Adapter
Berlingo BSI OBP Adapter
TACHO OBP Adapter
BSI(MCU) ICP
DASH OBP Adapter
Jumper OBP Adapter
Relay OBP Adapter
Synergy OBP Adapter
Picasso BSI OBP Adapter
Meter Adjustment OBP Adapter
Dash OBP Adapter
2007 OBP Adapter
Saxo (NEC) NEC Adapter
Triomphe BSI OBP Adapter
TACHO OBP Adapter
Meter OBP Adapter
Xantia OBP Adapter
Dispatch OBP Adapter
Jumpy OBP Adapter
Evasion Jaeger OBP Adapter
Xsara 2000\2002 OBP Adapter
NEC MCU NEC Adapter
BSI OBP Adapter
TACHO OBP Adapter

Peugeot model lists:

Type Information Adapter
206 BSI OBP Adapter
Meter OBP Adapter
MCU ICP Adapter
306  IC OBP Adapter
307 BSI OBP Adapter
Meter NEC Adapter
CC OBP Adapter
03-、06-、08- OBP Adapter
407 BSI OBP Adapter
TACHO OBP Adapter
607 BSI OBP Adapter
Meter OBP Adapter
1007 BSI OBP Adapter
Meter OBP Adapter
Expert CPU ICP Adapter
406 VDO  IC OBP Adapter
406(New) BSI OBP Adapter
VDO OBP Adapter
807 Dash OBP Adapter
Boxer V1  IC OBP Adapter
Boxer V2  IC OBP Adapter
SAGEM C46  IC OBP Adapter
806 Jaeger CPU ICP Adapter

NOTE:

Digimaster III msater not only is good at car odometer correction, but supports audio decoding, resetting airbage, ECU programming, reading PIN, and BMW key programming. You can free download Digimastar3-vehicle-list.xls   (542.5K)  to know more!

Ceci est Révision KM d’Odomètre du support technique du site Web DIYobd2.fr:Télécharger Digimaster 3 Citroen & Peugeot Liste de changement km

V1.2 PSA BSI for Peugeot and Citroen Software Download

PSA BSI odometer correction tool includes PSA BSI software and hardware. PSA BSI software functions EOBD2 list below:
  1. Read/Write KM stored in BSI
    2. Read PIN code stored in BSI and use it to learn key
    3. Read BSI Flash
    4. Write BSI Flash produced by Johnson Controls
    5. Read/Write BSI EEPROM produced by Siemens VDO
Please contact the hardware into PC before run PSA BSI software
Software version: V1.2
Language: English
Operating system: Windows XP
Update: Upgrade via email
PSA BSI odometer correction tool support vehicle list, please check here .
Free download PSA BSI tool v1.2 software and driver
The user manual in the package displays exactly how to read and write EEPROM, how to change odometer by PSA BSI KM tool.
 PSA BSI tool software display:


Tacho Pro Plus V2008 July Version User Guide

Tacho Pro Plus V2008 July Version User Guide

Step 1: Turn on power switch.

The Tacho Pro 2008 is powered by the vehicle via OBD socket. Please plug the device on the OBD port at the position port 3 to make sure Tacho unit has enough power supply. But do not plug it into position 3.

Step 2. Update Software

Connect Tacho Pro 2008 main unit into the computer USB port via cable. Make all the anti-virus software have been disabled before an update. After turn on the switch come to the start up menu, click “SYNC” on the menu to run an update.

Note: If you click on the wrong button, quit by press “STOP” button.

Step 3 Program Setting

After complete software update, come back to the start-up program.

Some menu options are offered here

1 Choose Language:

Select the language you want to program.

2 New PIN:

Enter the old PIN and Tacho will ask you to enter new 6-number PIN and repeat again.

3 Erase All EEPS:

You are offered the choice to delete all the eeps data saved before. PIN number is needed during the process.

4 Clear 1 EEP:

Clear the data saved the the last program.

5 Verify VIN:

Turn on/ off the PIN to start the Tacho Pro.

Step 4 Start Diagnose

When set all information of Tacho, click “SYNC” if the program ask you to. Connect the Tacho Pro 2008 main unit to the vehicle’s OBD socket via cable. Turn on the witch and select diagnostic function on the menu. Select specific mileage you want and to change and press “OK”.

Ceci est du support technique du site Web DIYobd2.fr:Tacho Pro Plus V2008 July Version User Guide

Tacho Pro 2008 July Problems& Solutions

Following part are the most frequently asked problems and corresponding solutions of Tacho Pro 2008 July version according to users’ feedback.

Here are the tool list used when solve problems

IC111 Chip

IC112 Chip

74HC541 Chip

AT24C02 Chip

Crystal Scillator

1) Problem: After turn on the switch, Tacho Pro does not display

Tool: IC111 and IC112 chip

Solution: Replace IC111 and IC112

2) Problem: Tacho device displays black strip without vehicle list

Tool: IC111 and IC112 chip

Solution: Replace IC111 and IC112

3) Problem: Tacho Pro can not read EEPROM

Tool: 74HC541 chip

Solution: Replace 74HC541

4) Problem: The device is frequently halting

Tool: IC111 and IC112 chip

Solution: Replace IC111 and IC112

5) Problem: Tacho screen shows RESET message

Tool: IC111 and IC112 chip

Solution: Replace IC111 and IC112

6) Problem: Tacho screen displays update handheld or sync note

Tool: AT24C02 chip, Crystal Scillator

Solution: First replace AT24C02 First. If the problem still exists, please replace Crystal Scillator

7) Problem: Tacho Pro displays Diga update message

Tool: IC111 and IC112 chip

Solution: Replace IC111 and IC112

Ceci est Révision KM d’Odomètre du support technique du site Web DIYobd2.fr:Tacho Pro 2008 July Problems& Solutions

Tacho pro 2008 July Dash Programmer full adapters and PCB

Tacho Pro 2008 is the simplest operation digital tachometers for DIYers. Following are the full set adapters/cables, firmware PCB board displays and simple operation guide provided.
Tacho pro July universal dash programmer unlock version
Tacho pro full adapters
tacho pro 3
tacho-pro-2008-1
tacho-pro-2008-2
tacho-pro-2008-3
tacho-pro-2008-4
Tacho Pro 2008 odometer correction tool PCB board display:
tacho pro 2008 PCB
Simple operation guides of Tachopro 2008 on mileage change for Ford Cougar, Ford Galaxy before 6/2000 and Galaxy after 7/2000 respectively.
Ford Cougar
Use the Scorpio plug
tacho-pro-cable-1
Remove the cluster and open it;
Lift the pins for the yellow and blue cable.
Connect the cables as shown in the picture.
Select the menu Ford-Cougar.
The Tacho Universal shows you the old value.
Enter the new value.
Verify the new value with OK.
Ford Galaxy before 6/2000
Use the OBD II -plug:
tacho-pro-cable-2
The diagnostic port is under the ashtray. And then turn ignition on, connect the Tacho Universal to the OBD II plug, select the menu Ford-Galaxy, write down the old code, set to 0. Now the display shows about 20 km, now adjust the mileage and finally put back in the code you have written down.
Ford Galaxy after 7/2000
Use the following plugs:
tacho-pro-cable-3
Connect those plugs together. If the VW new does not fit to the old A6, you have to remove one of the pins in the A6 old plug. You can see which one it is; otherwise the plugs will not fit together. The A6 plug will still keep all functions.
The diagnostic port is near your left knee when you sit on the driver’s seat. Steps as follow:
Turn ignition on, connection device and car select target car model, see old value and enter new value and verify. Actually, this is main steps of mileage correction with tacho pro 2008, but with slightly difference for each, so pay attention to this point.